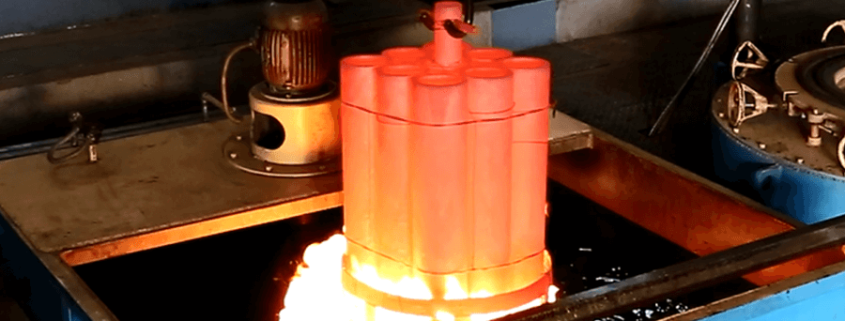
Analysis of the Causes of Ring-shaped Cracks in Quenched SAE 4140 Seamless Steel Pipe
The reason for the ring-shaped crack at the pipe end of the SAE 4140 seamless steel pipe was studied by chemical composition exam, hardness test, metallographic observation, scanning electron microscope, and energy spectrum analysis. The results show that the ring-shaped crack of SAE 4140 seamless steel pipe is a quenching crack, generally occurring at the pipe’s end. The reason for the quenching crack is the different cooling rates between the inside and outside walls, and the outside wall cooling rate is much higher than that of the inside wall, which results in cracking failure caused by stress concentration near the inside wall position. The ring -shape crack can be eliminated by increasing the cooling rate of the inside wall of the steel pipe during quenching, improving the uniformity of the cooling rate between the inside and outside wall, and controlling the temperature after quenching to be within 150 ~200 ℃ to reduce the quenching stress by self-tempering.
SAE 4140 is a CrMo low alloy structural steel, is the American ASTM A519 standard grade, in the national standard 42CrMo based on the increase in the Mn content; therefore, SAE 4140 hardenability has been further improved. SAE 4140 seamless steel pipe, instead of solid forgings, rolling billet production of various types of hollow shafts, cylinders, sleeves, and other parts can significantly improve production efficiency and save steel; SAE 4140 steel pipe is widely used in oil and gas field mining screw drilling tools and other drilling equipment. SAE 4140 seamless steel pipe tempering treatment can meet the requirements of different steel strengths and toughness matching by optimizing the heat treatment process. Still, it is often found to affect product delivery defects in the production process. This paper mainly focuses on SAE 4140 steel pipe in the quenching process in the middle of the wall thickness of the end of the pipe, produces a ring-shaped crack defect analysis, and puts forward improvement measures.
1. Test Materials and Methods
A company produced specifications for ∅ 139.7 × 31.75 mm SAE 4140 steel grade seamless steel pipe, the production process for the billet heating → piercing → rolling → sizing → tempering (850 ℃ soaking time of 70 min quenching + pipe rotating outside the water shower cooling +735 ℃ soaking time of 2 h tempering) → Flaw Detection and Inspection. After the tempering treatment, the flaw detection inspection revealed that there was an annular crack in the middle of the wall thickness at the pipe end, as shown in Fig. 1; the annular crack appeared at about 21~24 mm away from the exterior, circled the circumference of the pipe, and was partially discontinuous, while no such defect was found in the pipe body.
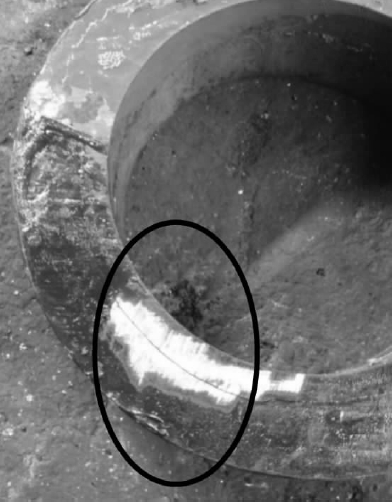
Fig.1 The Ring-shaped Crack at Pipe End
Take the batch of steel pipe quenching samples for quenching analysis and quenching organization observation, and spectral analysis of the composition of the steel pipe, at the same time, in the tempered steel pipe cracks to take high power samples to observe the crack micro-morphology, grain size level, and in the scanning electron microscope with a spectrometer for the cracks in the internal composition of the micro-area analysis.
2. Test Results
2.1 Chemical composition
Table 1 shows the chemical composition spectral analysis results, and the composition of the elements is in accordance with the requirements of the ASTM A519 standard.
Table 1 Chemical composition analysis results (mass fraction, %)
| Element | C | Si | Mn | P | S | Cr | Mo | Cu | Ni |
| Content | 0.39 | 0.20 | 0.82 | 0.01 | 0.005 | 0.94 | 0.18 | 0.05 | 0.02 |
| ASTM A519 Requirement | 0.38-0.43 | 0.15-0.35 | 0.75-1.00 | ≤ 0.04 | ≤ 0.04 | 0.8-1.1 | 0.15-0.25 | ≤ 0.35 | ≤ 0.25 |
2.2 Tube Hardenability Test
On the quenched samples of the total wall thickness quenching hardness test, the total wall thickness hardness results, as shown in Figure 2, can be seen in Figure 2, in 21 ~ 24 mm from the outside of the quenching hardness began to drop significantly, and from the outside of the 21 ~ 24 mm is the high-temperature tempering of the pipe found in the region of the ring crack, the area below and above the wall thickness of the hardness of the extreme difference between the position of the wall thickness of the region reached 5 ( HRC) or so. The hardness difference between this area’s lower and upper wall thicknesses is about 5 (HRC). The metallographic organization in the quenched state is shown in Fig. 3. From the metallographic organization in Fig. 3; it can be seen that the organization in the outer region of the pipe is a small amount of ferrite + martensite, while the organization near the inner surface is not quenched, with a small amount of ferrite and bainite, which leads to the low quenching hardness from the outer surface of the pipe to the inner surface of the pipe at a distance of 21 mm. The high degree of consistency of ring cracks in the pipe wall and the position of extreme difference in quenching hardness suggest that ring cracks are likely to be produced in the quenching process. The high consistency between the ring cracks’ location and the inferior quench hardness indicates that the ring cracks may have been produced during the quenching process.
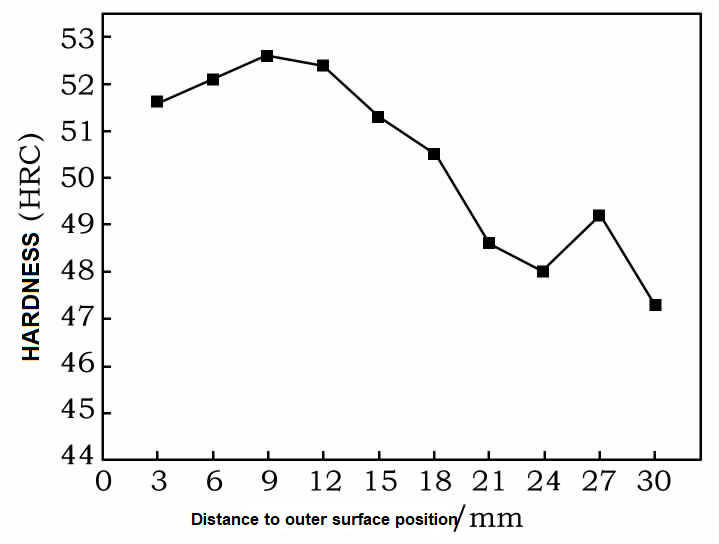
Fig.2 The Quenching Hardness Value in Full Wall Thickness

Fig.3 Quenching Structure of Steel Pipe
2.3 The metallographic results of the steel pipe are shown in Fig. 4 and Fig. 5, respectively.
The matrix organization of the steel pipe is tempered austenite + a small amount of ferrite + a small amount of bainite, with a grain size of 8, which is an average tempered organization; the cracks extend along the longitudinal direction, which belongs along the crystalline cracking, and the two sides of the cracks have the typical characteristics of engaging; there is the phenomenon of decarburization on both sides, and high-temperature grey oxide layer is observable on the surface of the cracks. There is decarburization on both sides, and a high-temperature gray oxide layer can be observed on the crack surface, and no non-metallic inclusions can be seen in the vicinity of the crack.
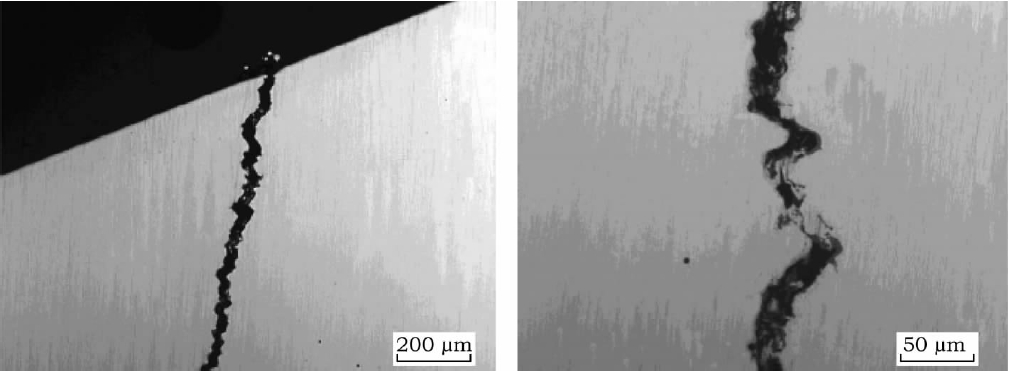
Fig.4 Observations of Crack Morphology
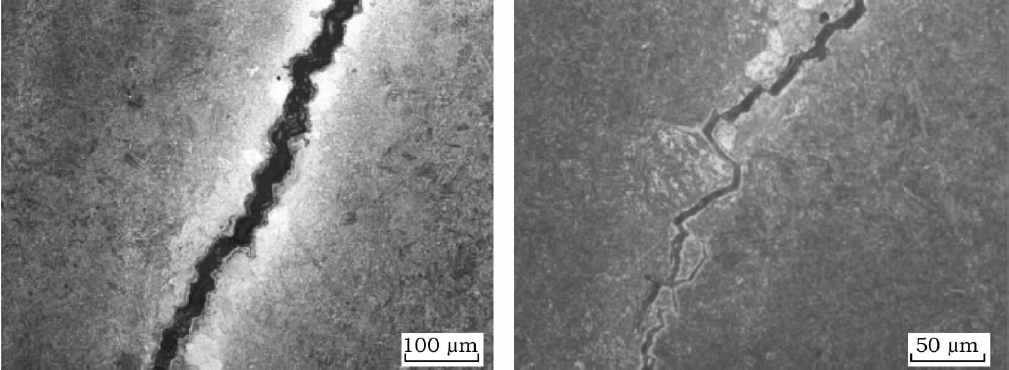
Fig.5 Microstructure of Crack
2.4 Crack fracture morphology and energy spectrum analysis results
After the fracture is opened, the micro-morphology of the fracture is observed under the scanning electron microscope, as shown in Fig. 6, which shows that the fracture has been subjected to high temperatures and high-temperature oxidation has occurred on the surface. The fracture is mainly along the crystal fracture, with the grain size ranging from 20 to 30 μm, and no coarse grains and abnormal organizational defects are found; the energy spectrum analysis shows that the surface of the fracture is mainly composed of iron and its oxides, and no abnormal foreign elements are seen. Spectral analysis shows that the fracture surface is primarily iron and its oxides, with no abnormal foreign element.
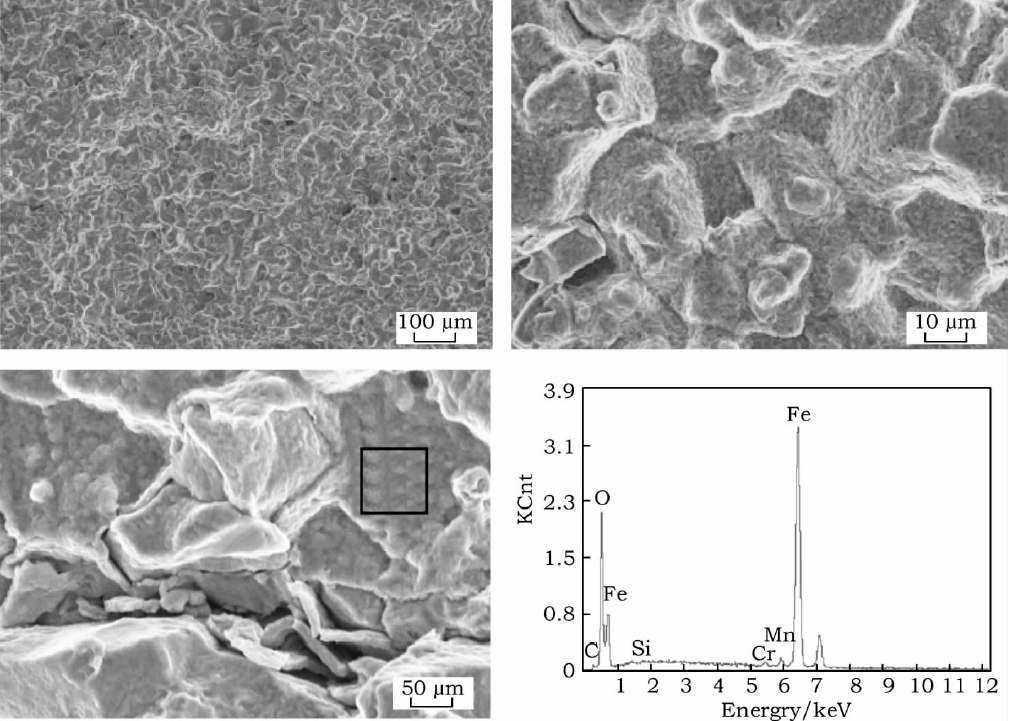
Fig.6 Fracture Morphology of Crack
3 Analysis and Discussion
3.1 Analysis of crack defects
From the viewpoint of crack micro-morphology, the crack opening is straight; the tail is curved and sharp; the crack extension path shows the characteristics of cracking along the crystal, and the two sides of the crack have typical meshing characteristics, which are the usual characteristics of quenching cracks. Still, the metallographic examination found that there are decarburization phenomena on both sides of the crack, which is not in line with the characteristics of the traditional quenching cracks, taking into account the fact that the tempering temperature of the steel pipe is 735 ℃, and Ac1 is 738 ℃ in SAE 4140, which is not in line with the conventional characteristics of quenching cracks. Considering that the tempering temperature used for the pipe is 735 °C and the Ac1 of SAE 4140 is 738 °C, which are very close to each other, it is assumed that the decarburization on both sides of the crack is related to the high-temperature tempering during the tempering (735 °C) and is not a crack that already existed before the heat treatment of the pipe.
3.2 Cracking causes
The causes of quenching cracks are generally related to the quenching heating temperature, quenching cooling rate, metallurgical defects, and quenching stresses. From the results of compositional analysis, the chemical composition of the pipe meets the requirements of SAE 4140 steel grade in ASTM A519 standard, and no exceeding elements were found; no non-metallic inclusions were found near the cracks, and the energy spectrum analysis at the crack fracture showed that the gray oxidation products in the cracks were Fe and its oxides, and no abnormal foreign elements were seen, so it can be ruled out that metallurgical defects caused the annular cracks; the grain size grade of the pipe was Grade 8, and the grain size grade was Grade 7, and the grain size was Grade 8, and the grain size was Grade 8. The grain size level of the pipe is 8; the grain is refined and not coarse, which indicates that the quenching crack has nothing to do with the quenching heating temperature.
The formation of quench cracks is closely related to the quenching stresses, divided into thermal and organizational stresses. Thermal stress is due to the cooling process of the steel pipe; the surface layer and the heart of the steel pipe cooling rate are not consistent, resulting in uneven contraction of the material and internal stresses; the result is the surface layer of the steel pipe is subjected to compressive stresses and the heart of the tensile stresses; tissue stresses is the quenching of the steel pipe organization to the martensite transformation, along with the expansion of the volume of inconsistency in the generation of the internal stresses, the organization of stresses generated by the result is the surface layer of tensile stresses, the center of the tensile stresses. These two kinds of stresses in the steel pipe exist in the same part, but the direction role is the opposite; the combined effect of the result is that one of the two stresses’ dominant factor, thermal stress dominant role is the result of the workpiece heart tensile, surface pressure; tissue stress dominant role is the result of the workpiece heart tensile pressure surface tensile.
SAE 4140 steel pipe quenching using rotating outer shower cooling production, the cooling rate of the outer surface is much greater than the inner surface, the outer metal of the steel pipe all quenched, while the inner metal is not entirely quenched to produce part of the ferrite and bainite organization, the inner metal due to the inner metal can not be fully converted into martensitic organization, the inner metal of the steel pipe is inevitably subjected to the tensile stress generated by the expansion of the outer wall of the martensite, and at the same time, due to the different types of organization, its specific volume is different between the inner and outer metal At the same time, due to the various kinds of organization, the particular volume of the inner and outer layers of the metal is different, and the shrinkage rate is not the same during cooling, tensile stress will also be generated at the interface of the two types of organization, and the distribution of the stress is dominated by the thermal stresses, and the tensile stress generated at the interface of the two types of organization inside the pipe is the largest, resulting in the ring quenching cracks occurring in the area of the wall thickness of the pipe close to the inner surface (21~24 mm away from the outer surface); in addition, the end of the steel pipe is a geometry-sensitive part of the whole pipe, prone to generate stress. In addition, the end of the pipe is a geometrically sensitive part of the entire pipe, which is prone to stress concentration. This ring crack usually occurs only at the end of the pipe, and such cracks have not been found in the pipe body.
In summary, quenched SAE 4140 thick-walled steel pipe ring-shaped cracks are caused by uneven cooling of the inner and outer walls; the cooling rate of the outer wall is much higher than that of the inner wall; production of SAE 4140 thick-walled steel pipe to change the existing cooling method, can not be used only outside the cooling process, the need to strengthen the cooling of the inner wall of the steel pipe, to improve the uniformity of the cooling rate of the inner and outer walls of the thick-walled steel pipe to reduce the stress concentration, eliminating the ring cracks. Ring cracks.
3.3 Improvement measures
To avoid quenching cracks, in the quenching process design, all the conditions that contribute to the development of quenching tensile stresses are factors for the formation of cracks, including the heating temperature, cooling process, and discharge temperature. Improved process measures proposed include: quenching temperature of 830-850 ℃; the use of an internal nozzle matched with the centerline of the pipe, control of the appropriate internal spray flow, improving the cooling rate of the inner hole to ensure that the cooling rate of the inner and outer walls of thick-walled steel pipe cooling rate uniformity; control of the post-quenching temperature of 150-200 ℃, the use of steel pipe residual temperature of the self-tempering, reduce the quenching stresses in the steel pipe.
The use of improved technology produces ∅158.75 × 34.93 mm, ∅139.7 × 31.75 mm, ∅254 × 38.1 mm, ∅224 × 26 mm, and so on, according to dozens of steel pipe specifications. After ultrasonic flaw inspection, the products are qualified, with no ring-quenching cracks.
4. Conclusion
(1) According to the macroscopic and microscopic characteristics of pipe cracks, the annular cracks at the pipe ends of SAE 4140 steel pipes belong to the cracking failure caused by quenching stress, which usually occurs at the pipe ends.
(2) Quenched SAE 4140 thick-walled steel pipe ring-shaped cracks are caused by uneven cooling of the inner and outer walls. The cooling rate of the outer wall is much higher than the inner wall’s. To improve the uniformity of the cooling rate of the inner and outer walls of the thick-walled steel pipe, the production of SAE 4140 thick-walled steel pipe needs to strengthen the cooling of the inner wall.

